

How to evaporate alcohol from your tincture without heat or vacuum.
Evaporating the base solvent (ethanol) from your tincture will leave behind a potent concentrate of the botanical used to make your tincture. If working with cannabis or hemp tincture, the concentrate that is left behind will be a potent oil containing all of the cannabinoids including THC, CBD, CBV, CBG, and every other cannabinoid present on the original cannabis plant material.
Please Note: If you did not perform a decarboxylation step on the cannabis before tincturing, the concentrate will contain the acid forms of the cannabinoids. Learn more about decarboxylation to activate acid forms of cannabinoids into active forms here.

Different methods to evaporate - Which is best?
There are a number of different ways to evaporate away the ethanol from your tincture. Ethanol will naturally evaporate out of solution if left unattended for a long enough period. By changing the variables of temperature, air flow, or air pressure (think vacuum) the speed of evaporation of the ethanol can be greatly increased. Modifying the variables listed can be done independently, or in cooperation, and doing so however incorporates trade offs that should be considered.
Is heat required to evaporate alcohol from tincture?
Ethanol does not require heat to evaporate out of solution. If adding heat to the system, the speed of evaporation will be significantly increased, however issues of safety as well as the necessity to closely monitor the progress of the evaporation are introduced. Applying too much heat to the tincture can decarboxylate and then scald/burn the evaporated concentrate producing an unusable burnt final concentrate. Also, there are safety concerns with combining heat sources and ethanol vapors. One should never mix sources of heat and ethanol vapors without strongly considering the safety of the overall system, paying special attention to flame risks and adequate ventilation of the fumes/vapors created.
Is a vacuum required to evaporate alcohol from tinctures?
No, ethyl alcohol will evaporate at normal atmospheric pressure. Changing the air pressure of a closed system containing an ethanol tincture will lower the temperature at which the ethanol will naturally evaporate (the boiling point of the liquid). This can have the benefit of increasing the speed of evaporation while eliminating the safety concerns introduced by a heat source, as well as reducing the possibilities of burning/scalding a batch of concentrate as it nears completion. However, creating a sustained vacuum can be an expensive endeavor requiring specialized equipment designed for that sole purpose. Vacuum ovens and vacuum pumps require regular maintenance, have a high up front cost, and consume vacuum oil as part of their normal operation.
Incentivizing Evaporation of Alcohol Naturally (Without heat or vacuum)
Increasing air flow however has the benefits of increasing the speed of natural evaporation, without requiring special equipment, and without introducing the safety concerns presented with adding a heat source. Of all of the potential methods presented to increase the speed of the evaporation of the tincture, increasing the air flow is the method that we recommend based on the being the safest method. Also, because no heat is introduced to the system, there is zero risk of the final concentrate being ruined/burned/or over decarboxylated. Finally, increased air flow systems do not require any special equipment, materials, consumable oils (like vacuum pumps), and require no supervision while the evaporation is occurring.
How to build your own air flow evaporation system.
Building your own air flow evaporation system is simple, easy, convenient, and cost effective. When using increased air flow to evaporate the ethanol contained in a tincture, the two most important variables are 1.) Air flow amount (typically measured in SCFM or standard cubic feet per minute) and 2.) Surface area of the tincture exposed to the air flow.

The following design for AVA has been used to evaporate tincture into alcohol free concentrate since 2017 (according to my instagram). The design for AVA is presented free of charge for people to use to build their own, or to make modifications upon for their specific need.
To build your own AVA you will require the following raw materials. These materials are all available at your nearby big box store or local hardware dealer. There is no special ingredient, proprietary widget, or magic material that makes the AVA system work so good, all components can be obtained easily or substituted by some other material that will perform the same function.
1.) Two (2) wire bookshelves. The shelves used in the image measure 24″ wide by 12″ deep x 24″ tall. Two are used to create a cube design that can easily hold 4x trays of tincture, however I never load more than 2x trays in at a time. Wire construction is important as it provides the right amount of structure for holding trays of tincture, while also allowing for adequate air flow. Plastic shelving should be avoided as it does not provide enough air flow without compromising structural integrity of the shelf (it will start to bend under the weight of the tincture after repeated use). The rigidity of the wires also provides for convenient mounting locations for the box fan.
2.) A 20″ box fan. The standard kind with 3 speeds, though I never use any speed over #1 (the slow speed). A smaller fan will work too, but I’ve found that using a properly sized big fan reduces the risk of having a jet stream effect reducing the overall ability of the system to evaporate. The 20″ model coupled with the 24″ x 24″ foot print of the book shelves creates an even flow of air everywhere inside the unit.
3.) Clear or semi-transparent plastic sheeting. The function of this sheeting will be used to wrap your book shelves into an air tight fume hood. Clear or semi-transparent is recommended because it allows in light so that you can see the trays of tincture inside the unit while the evaporation is progressing. Conversely dark black plastic wrap, will work just fine for containing air flow, but will render the inside of your AVA into a dark cave that will need additional lighting to be able to see inside. Source at least 100 square feet of clear plastic sheeting to cover an AVA measuring 24″x 24″ x 24″.
4.) Furnace Air Filter. 20″x 20″ model to fit the size of your box fan. This component will filter any foreign particles contained in your room air from your evaporated concentrate. Opting for HEPA filtration might be an added benefit depending on the quality of the room air in your local environment, however not a hard requirement.
5.) 6″ Flexible Dryer Duct Hose. This is the flexible silver “hose” that is typically run from the back of a standard household dryer to the out door vent. The standard dryer duct hose measures 4″, seek out the next available size up at 6″. How much length should you plan on? You will run at least 2x of these hoses out to the nearest window to vent the ethanol vapors outdoors. If you can source 8″ duct work, even better. Your box fan is capable of creating way more air flow than the duct work can likely vent, so increasing the amount of duct vents will increase the efficiency of your AVA. My current design uses two (2) 6″ duct’s with about 12 feet of length per hose. If you are limited to sourcing 4″ duct hoses only, plan on enough length of hose to run three (3) ducts out of the top of your evaporator.
Other materials needed for construction of your AVA:
- Zip ties – These are used to secure your book shelves together, and to mount the box fan to the bottom of the bookshelf.
- Duct Tape – Used to seal off any areas where air might escape vs being vented through the duct work. Have at least 2x rolls handy. White is recommended, but any color will work. White duct tape blends in easily with the semi-transparent plastic wrap, keeping the job looking tight and professional.
- Air Conditioner Weather Stripping – This foam is used to ensure an air tight seal between the box fan and the book shelf bottom. Any weather stripping or foam will work here, but the Air Conditioner variety available at local hardware stores is soft and supple enough to provide a good seal without too much fuss or precision.
- Velcro – Used to seal the door. Source the “industrial variety” which comes in 2″ wide strips and is especially durable for repeated opening and closing.
- Foam or Wood for mounting duct work in window – Any material will do here, the function is to adequately hold the exhaust duct work in a way that can be mounted in a window while providing some kind of back draft seal. All windows are shaped differently, personally I have had success with a rectangle of 2″ blue insulation foam cut to 12″x 18″. In this rectangle I have cut 2x 6″ holes which fit my 2x 6″ dryer hoses. When performing an evaporation, the 12″x 18″ foam rectangle fits the opening of my window perfectly, preventing any back draft of ethanol vapors back into the house. The snugness of this fit means winter installations will not result in snow or cold air back draft affecting the room temperature either. If foam is unavailable or undesirable, a wooden setup with similar holes will perform the same function.


How to construct your own AVA (Alcohol Vanishing Apparatus)
Step 1.) The Frame Assemble the wire bookshelves and position them next to each other so they form a cube. These wire bookshelves are typically provided with 3x shelves that can be mounted at various heights using the provided mounting hardware. The recommended mounting heights are as follows: Mount the bottom most shelf at 8″ from the bottom feet. This height provides enough room to mount the box fan while also allowing adequate air flow into the fan. Mount the middle shelf approximately 12″ from the bottom shelf. The middle shelf will be the primary location for holding the trays of tincture for evaporation. This shelf can be mounted lower rather than higher if it will make for a more convenient location for loading and observing the trays of tincture. Mount the 3rd shelf at the top most available spot on the shelf. The top shelf will serve only as structural support for mounting the flexible duct hoses later in the assembly.
Step 2.) Finalizing the Frame. Once the location of the shelves is finalized, fasten the two book shelves together tightly using the zip ties.
Step 3.) Prepare Foam Weatherstripping. Cut the air conditioner weather-stripping into 20 inch strips. Cut four (4) strips 20″ long each.
Step 4.) Mount the Fan. Mount the box fan to the bottom of the wire bookshelves. Do this by weaving the zip ties through the grate of the box fan and then through the wire metal shelving. Before tightening the zip ties, insert the air conditioner weather stripping foam in between the box fan and the wire shelf, along the perimeter of the fan. Pull the wire ties tightly to secure the fan to the wire shelf and to compress the foam weather stripping proving an “air tight” flow of air up through the bottom most wire shelf. Alternatively, you can make a seal between the fan and the bottom shelf using more duct tape.
Step 5.) Make a Shell. Wrap the outside of the wire bookshelves with plastic wrap. Wrap the top, left side, right side, and back of the bookshelf with plastic. The bottom should remain open because the fan needs to draw air. Also, leave the front facing side open as this will serve as our access to the inside. Use duct tape to seal any creases or folds that may allow air flow to escape. Pay attention to seal around the sides of the fan on the bottom of AVA.
Step 6.) Seal the Shell. Using duct tape, apply to the perimeter of the front that has been left open. First, tape the left side and the right side, creating a 2″ wide perimeter of duct tape. Then tape the top and the bottom. Next, apply Velcro directly to this perimeter of duct tape.
Step 7.) Make the door. Using scissors, cut a 24″ x 24″ square out of the plastic wrap. Apply Velcro to the perimeter of the square. Note that the Velcro side chosen for this application should be the opposite side of Velcro chosen in step 6. Mount this square onto the front opening so that the opposing sides of Velcro attach to each other. This is the door, when it’s time to open, peel from the top down about half-to-3/4 of the way down. When ready to close, firmly press the two sides back together to create an airtight resealable door.
Step 8.) Venting. Measure the 6″ dryer duct hose to the appropriate length and cut 2x pieces. Looking top down, and starting from the front left corner, measure 8″ to the right and 12 inches to the back. Mark a dot using a Sharpie and cut a 6″ hole centered on this mark. Next, from the right front corner, measure 8″ to the left and 12 inches to the back. Mark a dot using a Sharpie and cut a similar 6″ hole centered on this mark. Mount the dryer hose over each cut out by threading a zip tie through the support wire of the duct hose through the wire of the top shelf. Use adequate duct tape to create an air tight seal between the plastic wrap and the duct work. If using 4″ ducts, create 3X holes evenly spaced to allow for even air flow.
Step 9.) Mount the duct hoses into the foam window insert. Mount the window insert into a partially opened window, use the upper window pane to hold the foam in place making a seal where all vapors go outside only.
Congratulation, you are Done! AVA is ready to use to evaporate ethyl alcohol from your tincture.
How to operate AVA to evaporate alcohol from tincture.
1.) Begin with an alcohol based tincture made with food grade ethanol. AVA cannot evaporate away isopropyl or other types of alcohol, only pure ethyl alcohol (ethanol) is food safe for tincture and can be used in an AVA.
2.) Obtain a large aluminum baking tray, check the dollar store where large trays are often available per piece. Avoid pans with grease or strength ridges in the bottom, choose the largest size available with a flat surface. The tray should be at least 2" deep, larger is better for transferring in batches of tincture that will reduce down in volume by 98%. Get 3" deep pans if available at your local store. Also, these pans will be reusable as they should not come in contact with the tincture.
3.) Obtain a Teflon sheet from SlickSheet via Amazon.com. Cut you Teflon sheet into a 20″ strip. This will permit 2x strips per roll with 8″ left over for the decarboxylation stage after evaporation.
4.) Using binder clips, secure your Teflon sheet to your aluminum tray. This takes some practice to get the sheet to fit just right. Don't cut the sheet so that the tincture remains on top of the Teflon (important when we get down to sticky goo phase) and recovery of the final concentrated product.
5.) Place your Teflon lined aluminum tray into your AVA. Do this step while the tray is empty so zero spills or wasted product.
TLDR: Don’t add the tincture yet, you will add the liquid after loading an empty tray into AVA.
6.) Pour your tincture into the lined tray waiting inside your AVA. Adding the whole amount in small 8oz increments is recommended until you get a feel for your measuring cup's ability to accurately pour all contents into the tray (full cups dribble!). Fill up the tray to the top but leave about 1/2 and inch from the top of the lowest part of the teflon lining. You can also add more tincture after 12 hours or more of running, without any affects on the final outcome beyond taking longer to reach done.
7.) Close up the velcro door.
8.) Turn your box fan onto setting 1 (low).
9.) Wait. This process will take about 100 hours to evaporate 128 fl oz of tincture.
Wait for 100 Hours? What?
Yes, on average, it will take AVA about 100 hours of unsupervised operation to completely evaporate a gallon of cannabis tincture. If you make a tincture on Monday, you will have concentrate by Friday, but you need not check on the process at all throughout that period of time.
- 100 Hours = 4.16 days.
- If it's 6PM on Monday, 100 hours from now will be 10PM on Friday.
Factors that affect evaporation rate of AVA
Due to the simplicity of the design and function, there are a number of external factors that can affect the evaporation rate achieved by AVA.
- Volume of tincture you are evaporating - Incase it is not obvious, a large volume of tincture will take more time to fully evaporate vs a small volume of tincture. Large batches take longer to evaporate away.
- Surface area in contact with airflow - The more tincture that is exposed to the air flow, the faster the overall evaporation process will be. Choosing a wide, shallow, dish or tray will incentivize evaporation over deep bowls with reduced surface area. This become more important as the liquid is reduced down to a sticky goo, deep bowls can evaporate unevenly to the extent of forming a wax-layer type of seal over the remaining alcohol tincture.
- Air temperature - Because volatility is increased as temperature increases, warmer air will evaporate away alcohol tincture faster than colder air. Care should be taken to observe the humidity level of the air, where warmer air generally has increased levels of humidity present which can further affect your evaporation.
- Air Humidity - If the air you are pushing over your tincture is "humid", the evaporation rate of your tincture will be affected in a negative way (ie slow down).
What makes AVA "Set and Forget".
Because there is no heat added to the system, there is no potential for any over cooking, over decarboxylation, caramelization, scorching, or risk of fire from spark or other ignition source.
What does "done" look like?
- Day 1, first 24 hours - As AVA runs, you will see a daily progression of evaporation of your tincture, evidenced by the lowering level of liquid in your teflon coated tray.
- Day 2, 48 hours - Liquid tincture level continues to fall but the bottom of the tray is still covered in liquid. the color of the tincture will be brown to golden brown as the chlorophyl oxidizes.
- Day 3, 72 hours - Dry patches should be visible on some of the bottom of the tray, visible puddles remain with what looks like a layer of wax (it is natural hemp wax from all of those trichome heads actually!) coating the puddles of liquid. Yes, tipping the tray to break any puddles and thereby increase the surface area of liquid to air contact to incentivize evaporation, but is not required.
- Day 4, 96 hours - Puddles from the day before should not move when the tray is tipped and tilted. Concentrate dried on the teflon sheets should be honey-like goo consistency or even dry to the touch depending on the thickness and dry level.
Steps After Evaporation - Retrieving Your Concentrate
Benefits of "Dry" vs "Sticky" Concentrate
If you have ever made RSO, or have used an "extract machine", you may be familiar with the sticky-product that must be transferred from the making vessel to some storage container. This step can often result in mess, odor, and waste if the goo of most other cannabis concentrates is not fully contained. Cold air evaporated concentrates can be dried past the ooey gooey sticky phase making handling, dosing, and dispending quick easy and convenient.
What to do after AVA has evaporated all of the alcohol
Fold the slick sheet in half, pressing the two halves of concentrate together. A warm (not hot) iron or mug of water will help merge the layers and smooth out any bumps.
Quickly rip the top layer of the slick sheet up and away from the layer of concentrate. If done properly, a clean removal will occur leaving behind 95% of the concentrate.
Repeat by folding, smoothing, and ripping until a manageable slab is created.
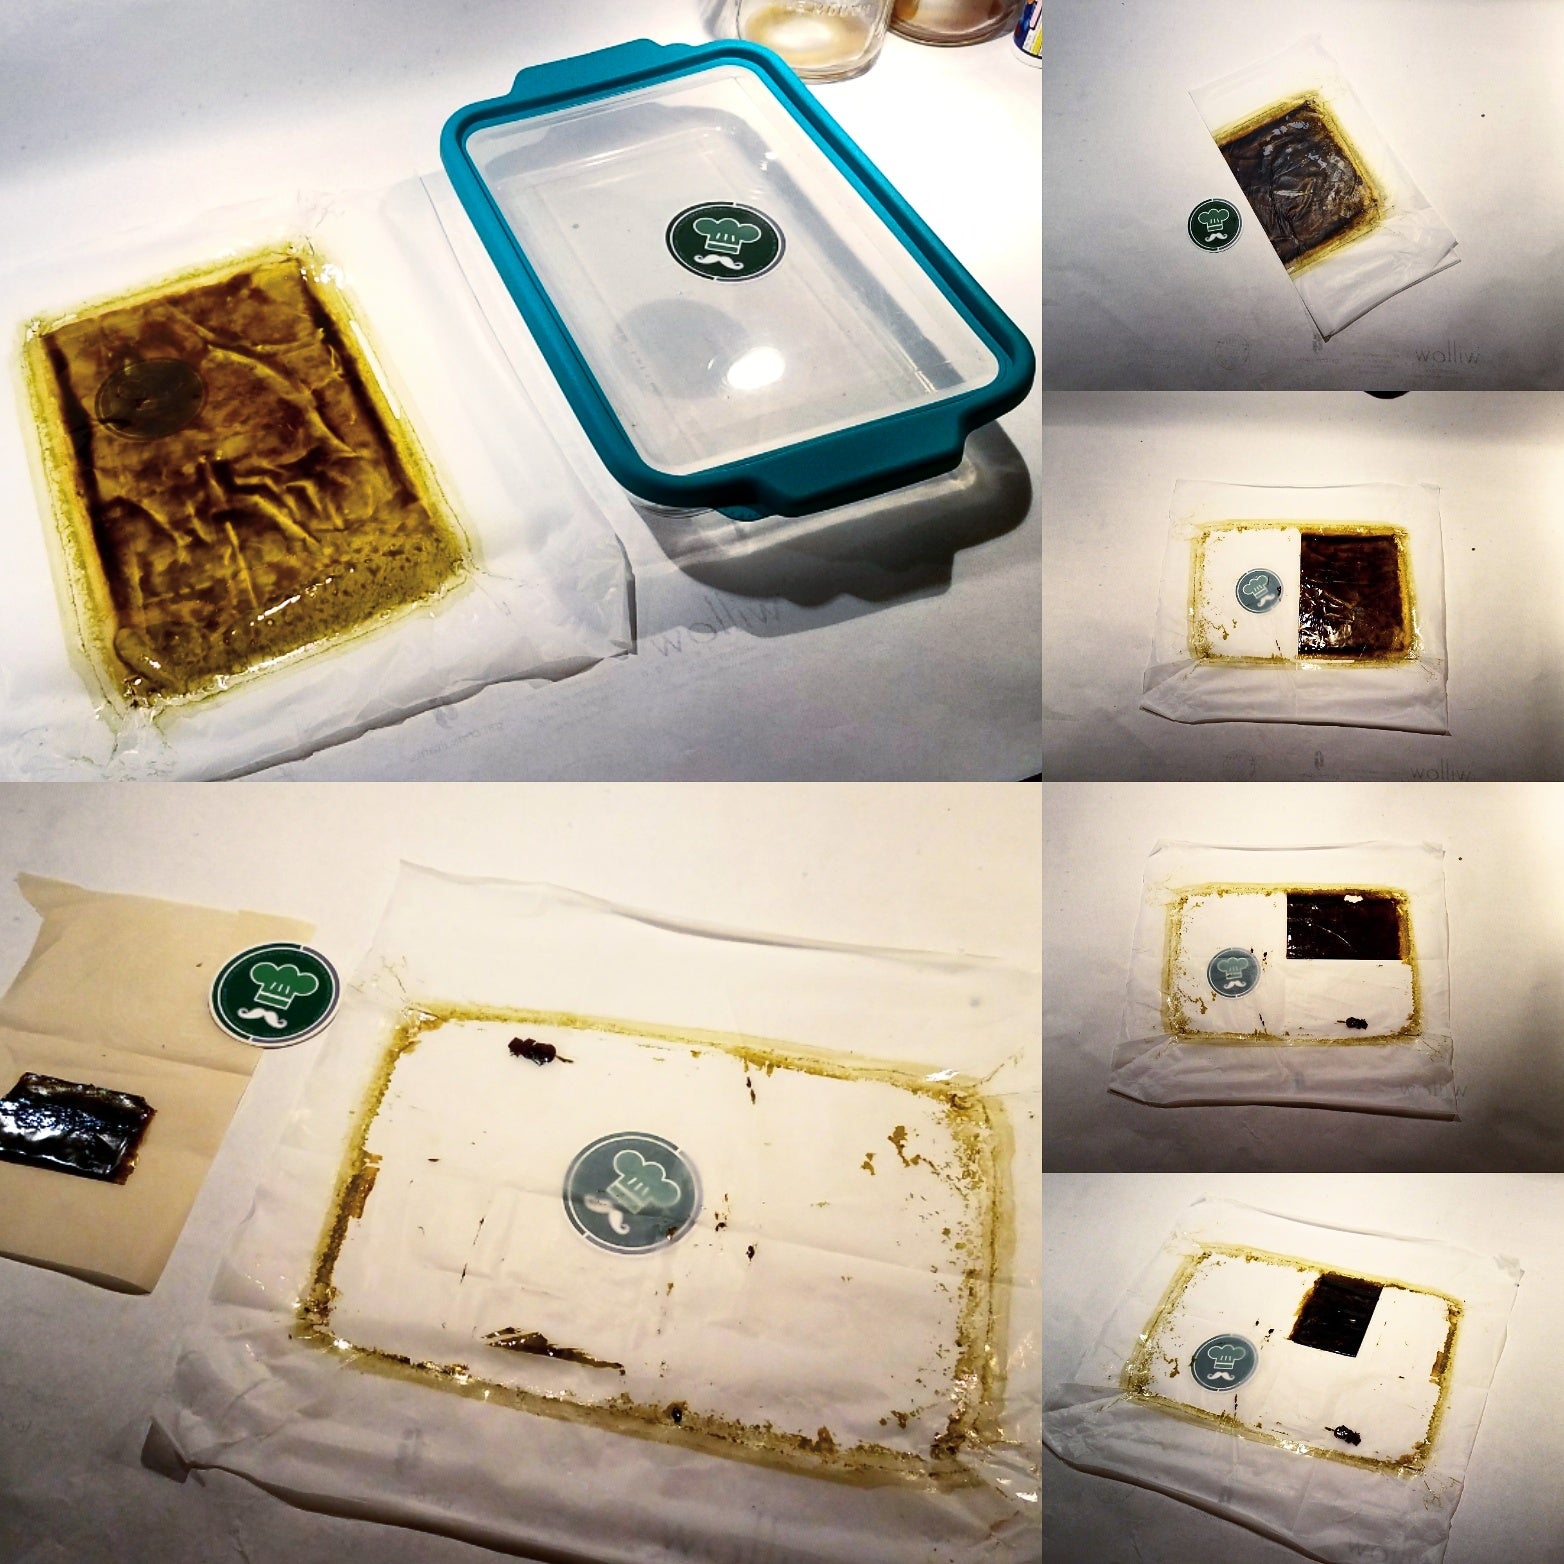
The dark brown slab on the left is finished evaporated 200 proof alcohol tincture concentrate. If the cannabis used to make the original tincture was decarboxylated, then this concentrate can be consumed with no further steps required. If you did not decarboxylate the cannabis before tincture, follow these steps to decarboxylate your cannabis concentrate (posted soon). Once decarboxylated, you can dilute with MCT oil to make a potent alcohol free cannabis tincture. Recipe posted soon.
The Teflon slick sheet can be reused for at least 2 batches of evaporated concentrate. Reuse the Teflon sheet as long as the fold seems remain unbroken so that the liquid tincture does not leak through and condense on the tray. Any concentrate remaining on the border of the Teflon sheet will redissolve into the 200 proof alcohol of the next batch of tincture! If you do not plan to reuse the Teflon sheet, a rinse of 200 proof alcohol will dissolve the concentrate left on the Teflon sheet so that it may be reclaimed at a later date.
What if my tincture is not done after 96 hours?
Give it another day. Maybe 2 days. Depending on the strain, age, cure level, soak time, soak temperature, filtering, winterization, air flow temp, and air flow humidity variables you may need much longer than 100 hours. Very dry January cold air days will save 4-6 hours on an evaporation run, a rainy day in March might add 24 total hours to the evaporation... But, what is known for sure is that there is no way to spoil/ruin or over do the evaporation stage when just using cold air in AVA. Weather affecting your evaporation run is unfortunate, however rest assured that waiting will be rewarded. There is no "too dry", to reiterate, if you forget about AVA running, it doesn't matter, your finished concentrate will be ready when you remember to get back to it!
Where does the alcohol go?
The low concentration of alcohol vapors are pushed away from the tincture and out a nearby window if the duct work and window mount are installed as described. The vapors are created by ethanol's natural evaporative properties at room temperature and normal atmospheric pressure.
Is it possible to reclaim the alcohol evaporated by AVA?
No, there is no way to recondense the alcohol vapors back into alcohol liquid for reuse in another tincture. There are a number of commercial and kitchen equipment pieces that make reclaiming possible, however as the "V" in AVA implies, the alcohol here has vanished.
Does AVA make a sound?
Not really. The only piece generating a sound would be the box fan, which runs at it's lowest setting of 1, you can pretty much not notice AVA is running if you are in the same room with it.
Can you smell AVA running?
Not in my personal experience. However, all plants are different, and your evaporation run may be noticeable to neighbors.